ShopDreamUp AI ArtDreamUp
Deviation Actions


Description
So this is not really a tutorial but i just wanted to show you how you have to take pictures so you can compile them in an HDR application.
--- Setup
First you have to take pictures of the exact same theme. So you cannot just take a snapshot and try to turn this one into an HDR picture afterwards. I recommend a tripod or anything else where you can set up your cam so that it doesn't move, even if you change options for taking pictures. This is usually a tripod (Wink)")
--- Conditions
Make sure you have nothing that moves too much in the picture. On a windy day you wont be able to take good HDR pictures, cause moving trees just blur the picture or result in shadows in the final picture. And i bet you dont wanna spend time photoshopping them out. Sometimes clouds can become a problem or make the picture even nicer. If clouds move horizontal along the horizon, then you'll have the same structure for the clouds like 4 times in the picture which looks awkward in the result. But if you have moving clouds, which even maybe mix up the sky a little, then you'll get an even more contrast rich sky in the result.
--- Settingup the Camera
I've used 2 different ways to achieve different brightness and details in the photos i wanna use for a HDR Picture.
a) use different lens apature. This is good for daytime pictures.
b) use different exposure times. This is good for night and twilight
But it depends on your camera when you should use which method and maybe some cameras behave different depending on the light.
--- Taking the pictures
When taking the pictures you can decide to take between 2 and maybe 5 pictures. But i dont see a point in taking more then 5. For most applications 3 should be enough. 2 is a backup solution if you screwed one image up for example.
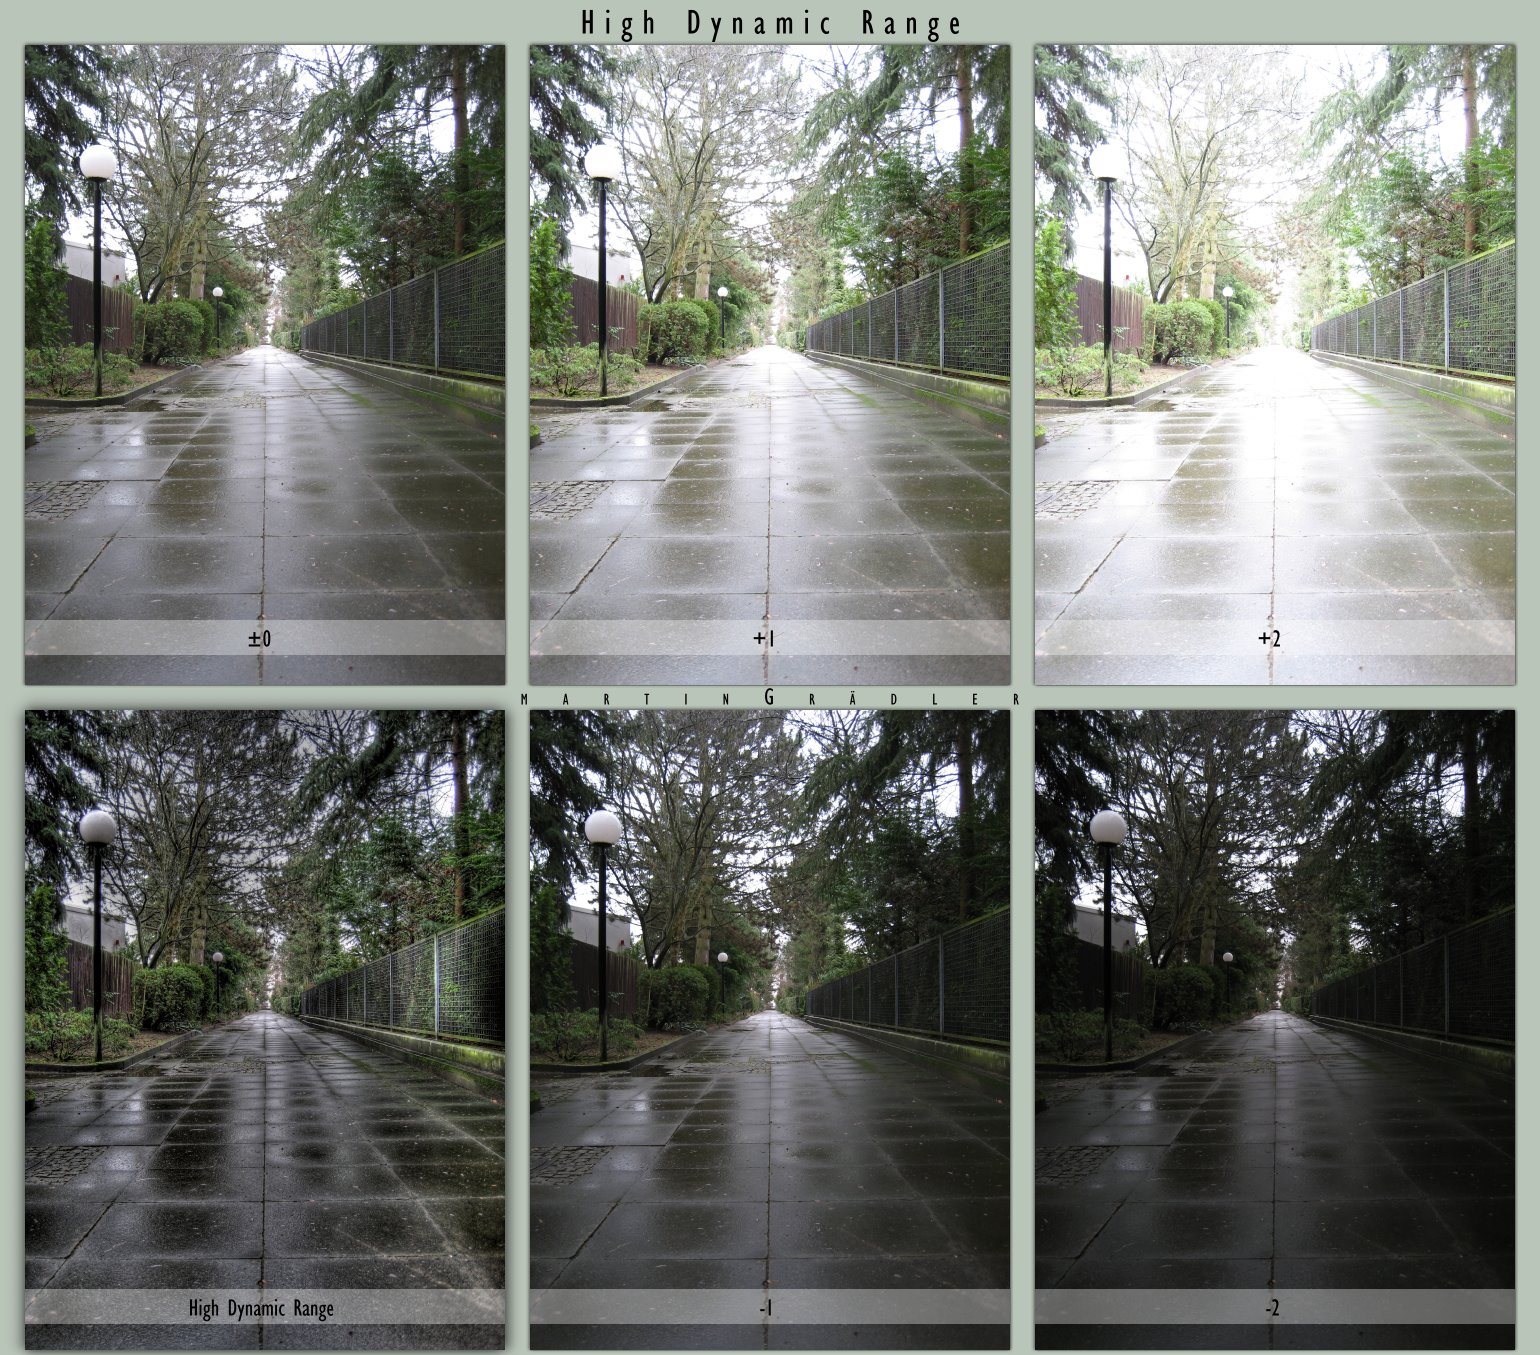
Make sure when you take the pictures that they all have different levels of brighness. Otherwise the HDR effect won't turn out very well. I showed above a good example of a range of pictures (lens apature from -2 to +2).
You should always make sure you do not move the camera in any way, otherwise you can start all over again.
--- Postprocessing
I'm not giving any tutorials for applications here just recommendations.
a) Photomatix: great tone-mapping, easy to use, but screws up auto-aligning some times. Good for: Dramatic Pictures
b) PhotoImpact: avarage tone-mapping, easy to use. Good for: Natural looking Pictures
c) PhotoShop: avarage tone-mapping, difficult to use. Good for: Natural looking Pictures
--- Advices:
- Avoid any kind of noise in the pictures, especially if you wanna use Photomatix (it boosts noise extremely). Keep the ISO low for less noise.
- Do not abuse the tone-mapping, you can really create unreal pictures with it, but that's not what HDR is for.
- Use HDR to enhance contrast/colors in your pictures and to even brightnesslevels and glowing of certain areas.
So okay, now enjoy taking HDR pictures.
Martin
------
Okay this turned out to be longer then I thought. suggestions via note please.
--- Based on my own few experiences with HDR Pictures (Check my Gallery)
--- Setup
First you have to take pictures of the exact same theme. So you cannot just take a snapshot and try to turn this one into an HDR picture afterwards. I recommend a tripod or anything else where you can set up your cam so that it doesn't move, even if you change options for taking pictures. This is usually a tripod
--- Conditions
Make sure you have nothing that moves too much in the picture. On a windy day you wont be able to take good HDR pictures, cause moving trees just blur the picture or result in shadows in the final picture. And i bet you dont wanna spend time photoshopping them out. Sometimes clouds can become a problem or make the picture even nicer. If clouds move horizontal along the horizon, then you'll have the same structure for the clouds like 4 times in the picture which looks awkward in the result. But if you have moving clouds, which even maybe mix up the sky a little, then you'll get an even more contrast rich sky in the result.
--- Settingup the Camera
I've used 2 different ways to achieve different brightness and details in the photos i wanna use for a HDR Picture.
a) use different lens apature. This is good for daytime pictures.
b) use different exposure times. This is good for night and twilight
But it depends on your camera when you should use which method and maybe some cameras behave different depending on the light.
--- Taking the pictures
When taking the pictures you can decide to take between 2 and maybe 5 pictures. But i dont see a point in taking more then 5. For most applications 3 should be enough. 2 is a backup solution if you screwed one image up for example.
Make sure when you take the pictures that they all have different levels of brighness. Otherwise the HDR effect won't turn out very well. I showed above a good example of a range of pictures (lens apature from -2 to +2).
You should always make sure you do not move the camera in any way, otherwise you can start all over again.
--- Postprocessing
I'm not giving any tutorials for applications here just recommendations.
a) Photomatix: great tone-mapping, easy to use, but screws up auto-aligning some times. Good for: Dramatic Pictures
b) PhotoImpact: avarage tone-mapping, easy to use. Good for: Natural looking Pictures
c) PhotoShop: avarage tone-mapping, difficult to use. Good for: Natural looking Pictures
--- Advices:
- Avoid any kind of noise in the pictures, especially if you wanna use Photomatix (it boosts noise extremely). Keep the ISO low for less noise.
- Do not abuse the tone-mapping, you can really create unreal pictures with it, but that's not what HDR is for.
- Use HDR to enhance contrast/colors in your pictures and to even brightnesslevels and glowing of certain areas.
So okay, now enjoy taking HDR pictures.
Martin
------
Okay this turned out to be longer then I thought. suggestions via note please.
--- Based on my own few experiences with HDR Pictures (Check my Gallery)
Image size
1540x1355px 518.94 KB
© 2007 - 2024 real-creative
Comments37
Join the community to add your comment. Already a deviant? Log In
Great walkthrough  (Smile)") I've done it similar in the past but I think explains it very well.
I've done it similar in the past but I think explains it very well.
Good job on giving back to the community
Good job on giving back to the community